 It’s impossible to predict what will kickstart my preserving season. This year, it was an abundance of strawberries I served to guests. Hulled the day before, the berries were vulnerable and would soon start to ferment. I had mangos, too, so ripe they filled the kitchen with their sweet perfume. This is the way I work myself toward a batch of jam. What’s in the house, how much does it weigh, what smells ripe. I won’t work with less than 1 kg.
Grab the sugar and lemon juice (I always have both.) Wash and dry 4 half pint (8 oz, 225 ml) jars because sometimes you need an extra. You’ll need a Dutch oven, colander, thermometer, and a long handled spatula or spoon. It’s time to locate the lids and rings. Set up the waterbath canner. And we’re off. Happy canning season.
Do not double this recipe. Instead, work with sequential batches.
Makes 3 half-pint jars plus some extra for enjoying immediately
500 g whole mangoes
500g hulled strawberries
400 g granulated sugar
Juice of one lemon
1/2 teaspoon unsalted butter
Peel and cube the mangoes and add fruit and juice to a medium bowl. Add the strawberries and, if they are large, use a potato masher to smash about 2/3 of the fruit. If they are small, smash only about 1/3 to 1/2. Keeping the strawberries whole will result in looser jam.
Stir in the sugar and lemon juice and continue to stir until the sugar has dissolved. Cover and allow the fruit to macerate with the sugar and lemon for 4 hours on the kitchen counter (out of the sun, away from heat) or in the refrigerator for 8 to 24 hours.
Strain the jam through a colander, capturing the sugary syrup in a large Dutch oven or other heavy bottomed pot (at least 5 quart). Press gently against the fruit to express the last of the syrup and then place the colander in a bowl to continue to capture any last bits.
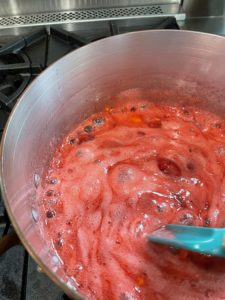
Place the pot over medium high heat and bring to a strong boil, stirring all the time so that it doesn’t scorch. Bring the syrup to 220°F — this will take about 10 minutes. Stir in the fruit and any accumulated liquid and bring to a strong boil. Do not step away. Stir, but not obsessively. The jam will be ready when all the excess waters have boiled off. It will start to boil slowly and then faster, creating foam. Don’t worry about the foam! There is no need to skim. Stir and bring the jam to a higher and higher temperature. It’s thickening under all those bubbles. When the surface has mostly cleared (about 10% will still have some foam), your jam will be close to done. Add the butter and stir until the jam is clear.
At this point, test the gel. You can use the cold plate test. You can watch the way the jam drips from the side of the spoon. Jam sets at around 218°F. AROUND. This temperature is not set in stone, and it’s also going to depend on how you like your jam.
Turn the pot off and step away for 5 minutes. Bring a spoonful of jam up out of the pot and pour it back in. Is it gathering as a gel, or pouring like a syrup? Keeping in mind that the jam will thicken as it cools, if it’s too thin, put it back on the stove, bring it back to a boil for 5 minutes or so, and test again.
This testing is the most challenging part of making jam, but the more you do it, the better you’ll get. Most first timers do not cook their jam long enough. They also tend to understir and scorch the jam. All of us, pros and new preservers, make a crummy batch of jam from time to time. Do not get discouraged. If it’s too lose, use it as a syrup. If it’s too thick, heat it and thin with broth or wine to make a sauce.
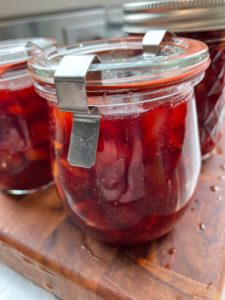
When the jam is done and while it is still screaming hot, fill the jars to 1/4-inch headspace (the first ring on the rim.) Clean the rim well, place the lid, tighten the ring.
Waterbath your jars for 10 minutes. (Add a glug of white vinegar to the water to keep mineral spots from forming.)
Sealed jars are shelf stable for one year. Refrigerate after opening.