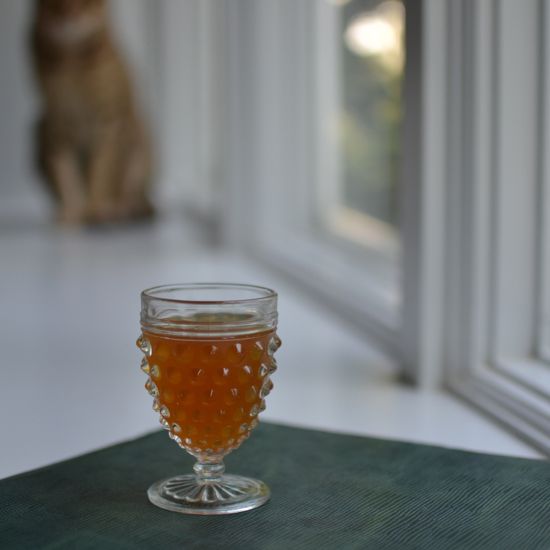
I am spending the week at the beach and in my absence, my most wonderful new kitchen assistant, Ally Kirkpatrick, is here guest blogging. Today, learn to make kombucha. It’s a wonderful drink, fresh tasting and healthful. And totally easy to make yourself. Follow @Ally_T_K on Twitter and visit The Green Cabin Year.
Kombucha is sweetened tea fermented by yeast and bacteria, and it’s everywhere these days: grocery stores, farmers markets, even on tap at restaurants and bars. For some it’s a health tonic, for others it’s just plain delicious. For me, it was a bit of both…
Hello. My name is Ally and I was once addicted to diet soda.
Some say acceptance is the first step in overcoming a problem, but in my case it was kombucha that set me free. I replaced one fizzy drink for another, exchanging citric acid and caramel coloring for black tea and bacteria, and I haven’t missed soda since.
It’s a bit embarrassing to admit that I was a diet soda junkie in the first place, perhaps because at the height of my dependence I was five years into a career in the specialty coffee industry working as a professional barista. I spent my days behind the espresso bar paying close attention to roast dates, learning about coffee origins and processing methods, and constantly tinkering with coffee brewing variables like dose weight, water temperature, particle size, and extraction time. Eventually I even ended up in the world of barista competitions, where a panel of industry pros armed with clipboards and score sheets would evaluate each drink I carefully crafted – even measuring the foam on my cappuccino down to the centimeter. All this training and tasting went into my work with coffee, and yet still I drank diet soda.
If I put so much care into coffee, I wondered, why stay hooked on what’s essentially carbonated chemicals? For my fizzy fix there had to be a better option out there. But mineral water, iced tea, flavored seltzer … they each lacked either flavor or fizz. Kombucha, it turns out, was just what I needed. It’s punchy and tart, fizzy and cold. And it’s delicious. But then I saw those Whole Foods receipts piling up and realized it’s also expensive. So that’s when I embarked on a taste testing journey into the living world of fermented foods and began my own komnucha project at home.
You can do the same – it’s really easy, and it’s worth it! Here’s what you’ll need for “primary fermentation”, which is the first half of the brew process:
Two kombucha SCOBYs
SCOBY is short for symbiotic culture of yeast and bacteria. Obtaining one is the trickiest part for most folks just starting out. I suggest buying a bottle of GTs plain kombucha from the store and growing your own mother culture. This process is similar to making your own sourdough starter, except that instead of capturing the good stuff from the air you’re buying it in a bottle and feeding it some sweet tea. Here’s a link for directions about that process from one of the authors of the book “The Lost Art of Real Cooking” – a terrific resource for any fermentation friendly kitchen.
This recipe calls for making two jars at a time because I like having one batch on hand to enjoy as plain kombucha. I use the other batch for a secondary fermentation (explained below) with fruit juice, tea, and herbs.
One cup of loose leaf Black Tea
You can make kombucha at home with lots of different types of tea. Try white, green, black…just avoid any variety that has added oils (such as Earl Grey, or citrus blends) which will harm your mother culture. Fresh, high quality loose leaf tea just tastes better than the stale, powdery tea in bags, and I figure if I’m going to the trouble of making kombucha at home, I want to make it taste better than the stuff you can buy at the store. The malty flavor present in nice black tea really stands up to the fermentation process. I use Rishi Tea’s China Breakfast, and I think its sweet malty character makes my kombucha reminiscent of a sour ale style of beer.
One cup of Sugar
For my home brewing I use evaporated cane juice. Kombucha can be made with other sweeteners, but be warned that not all SCOBYs are created equal – while some may thrive with maple syrup, honey, or brown sugar, others will not. When I tried brown sugar I almost lost my only SCOBY. Make sure you’ve grown a back up culture before experimenting with different sweeteners.
Four quarts of filtered water
You’ll use two quarts to make a strong batch of sweet tea. Store the other two jars in the fridge til they’re cold. After the tea is brewed you’ll add the two cold quarts to the hot tea, so there’s less waiting around for the tea to cool off to room temperature.
Four cups of mature (i.e. – already brewed) kombucha
If it’s your first batch, buy two bottles of plain kombucha (GTs brand is good.) You need this pre-fermented tea to keep the acid level up in your sweet tea to inhibit other funky stuff from growing and to give the mother culture a head start. Once you’ve brewed your first batch, save this amount for the next round. You must have at least 5 percent of your total ratio be mature tea. I use more here to speed up the process.
Two one-gallon glass jars
A glass wide-mouthed vessel is important because your SCOBY needs oxygen to ferment – the larger the surface area the quicker your brew.
Time
The amount of time you let your kombucha brew is up to you – after a two days it could be a little sweet still, after four days it might have more of a kick. The important thing is to taste test it to see if you like it. The amount of time also depends on how warm your home is – the warmer the faster the SCOBY will grow.
Step One: Boil two pints of filtered water and combine with tea leaves in a big bowl.

Step two: Add sugar to tea and steep for about four minutes.

Step three: Strain into your two one-gallon glass jars.

Step Four: Add a pint of cold water to each jar and wait for the mixture to come to room temperature.

Step Five: Then add your mature kombucha, pouring a half pint into each vessel.

Step Six: Add a SCOBY to each.

Step Seven: Cover securely with dish towels or cheese cloth and set somewhere out of direct light.

Step Eight: Taste after a few days to see if the sweetness is to your liking. If it’s ready then decant one pint of mature tea to use for your next batch. Bottle the rest (I use glass canning jars) and either store in the fridge or reserve for secondary fermentation, as explained below. Brew more sweet tea for the next batch and you’re ready to go for round two!

Secondary Fermentation: After you’ve completed the primary fermentation you can ferment again (without a SCOBY this time) in an airtight bottle at room temperature. This is the step at which you can get creative and add different ratios of fruit juice, herbs, ginger, etc. As the yeast and bacteria develop in the airtight bottle pressure will build, so don’t leave them for too long in too warm of an environment. You can determine your kitchen’s secondary fermentation limits by opening your first batch after one day and seeing if you’ve got a fizz yet. If not, try for two, etc. I find it useful to keep a notebook with recipes of secondary fermentation mixes that I enjoyed. For example, one part kombucha, one part mint/green tea blend, a handful of mint leaves, wildflower honey, then two days on the shelf. They are endless options for flavor combinations at this stage – it’s my favorite part of the whole process.
Happy Fermenting!
— Ally
p.s. – Rishi Tea will be giving away a tasting flight of black teas to readers of my blog. Come say hello and leave a comment at The Green Cabin Year to be entered to win. I’ll be choosing a winner in a week.


Sharon O'Connor
Thanks but where is the link for making the mother?
Cathy
OOPS. Good catch – there’s a link there now.
gluttonforlife
I’ve been making kombucha for a few months now and think you’ve done a great job of laying out the process. I love both fresh ginger and pomegranate for my second ferment.
Sweet Virginia
Thank you for laying out these steps – when you explain it like this it sounds much easier than I always imagined it would be (and actually gives me courage to make some!). I think I’ll try my hand at making some with white tea and then adding peach juice during the second fermentation… I’ll let you know how it goes!
janay
I don’t know how you managed to do it but you did. You’ve convinced me that I,too, should and can make kombucha, whereas previously my beverage based culinary endeavors stopped after creating the perfect glass of chocolate milk.
Lisa K.
Thank you for this post- your timing is perfect! A friend just gave me 2 SCOBYs and I wasn’t sure how to proceed. Your tutorial is really helpful and i’m headed to the kitchen now to brew some tea!!!
Bev
This is so much better than store bought kombucha. Thank you for introducing kombucha to me.
Cindy
I am addicted to tea and yet I’ve never tried Kombucha. How is that possible? It is now on my list of things to do in September. My question here is…what the heck is a scoby?
Cathy
Check back — Ally’s got a description of the SCOBY and how to make one in the 7th paragraph.
Brandon Fox
I’ve had Ally’s kombucha and it’s delicious–and made me a convert!
buy kombucha in bulk
I love Kombucha, will try this recipe